Hello दोस्तों आज हम एक ऐसे tdl फाइल के बारे में चर्चा करेंगे ,जिसकी मदद से आप अपने Tally Prime में आप इस TDL की मदद से आप Tally Prime में एक और Printer Option जोड़ सकते हैं पहले Tally Prime में Printer चुनने का कोई विकल्प नहीं था लेकिन इस TDL की मदद से आप इसे प्राप्त कर सकते हैं तो चलिए देखते हैं कि हम कैसे उपयोग कर सकते हैं इस tdl फ़ाइल का tally prime में ?
TDL Code For Adding Printer Option in Tally Prime
[#Part: Print Buttons]
Add: Button: At End: Change Printer

[#Button: Change Printer]
Use : InlineButton Template Large
Title : $$LocaleString:"Printer"
Space Left : 1.25% Screen
Step 2 : अब above code को Save करने के बाद Tally Prime पर TDL File अपलोड करें ( और अगर आपको Tally Prime पर TDL File upload करने का तरीका नहीं पता है तो नीचे दिए गए Link पर Click करें जो आपको Tally Prime पर TDL File अपलोड करने के लिए Guide करेगा )
Step 3: After loading the TDL you need to print an entry by pressing ALT+P then choose Current option from the dialog box
as shown below image

Step 4: As you can see a new option as Printer, now click on the printer option or press ALT+S, after selecting the option you can see dialog box will open and as for to choose the printer as shown below image
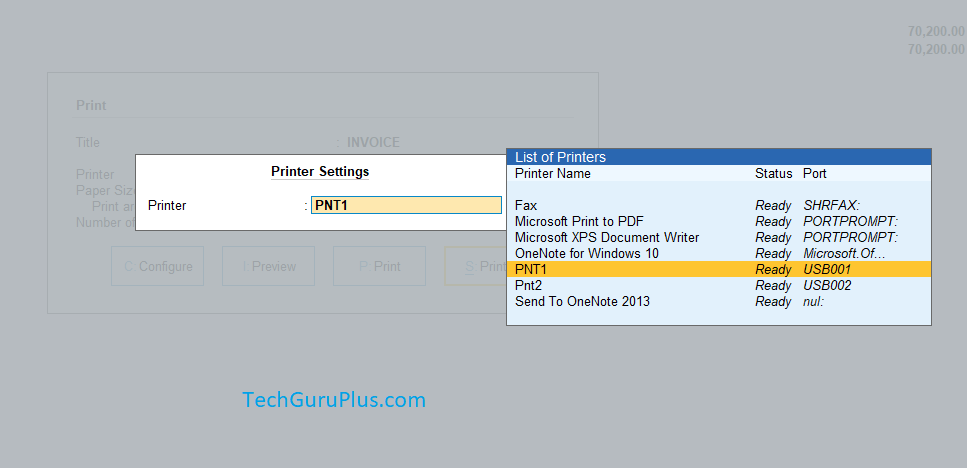
Step 5: Now select the desired printer and then one more box will open that as for page setup you can do your desire customization and then hit OK or press Enter to accept the changes. as shown in image

Step 6: Now go to Print Option to Print your Document in your Changed Printer
धन्यवाद दोस्तों! अगर आपको ये आर्टिक्ल पसंद आया हैं तो इसको सोशल मीडिया पर अपने दोस्तो के साथ जरूर से शेयर कीजिए, जिससे उनको भी ये जानकारी प्राप्त हो सके।
Download Button पर Click करके फ़ाइल डाउनलोड करें
 Join Our WhatsApp Group


Nazim Khan (Author) 📞 +91 9536250020
[MBA in Finance]
Nazim Khan is an expert in Microsoft Excel. He teaches people how to use it better. He has been doing this for more than ten years. He is running this website (TechGuruPlus.com) and a YouTube channel called "Business Excel" since 2016. He shares useful tips from his own experiences to help others improve their Excel skills and careers.


